PoE-powered GPIB Adapter With Ethernet And USB-C Support

In the world of (expensive) lab test equipment the GPIB (general purpose interface bus) connection is hard to avoid if you want any kind of automation, but nobody likes wrangling with the bulky cables and compatibility issues when they can just use Ethernet instead. Here [Chris]’s Ethernet-GPIB adapter provides an easy solution, with both Power over Ethernet (PoE) and USB-C power options. Although commercial adapters already exist, these are rather pricey at ~$500.

Features of this adapter include a BOM total of <$50, with power provided either via PoE (802.3af) or USB-C (5V-only). The MCU is an ATmega4809 with the Ethernet side using a Wiznet W5500 SPI Ethernet controller. There is also a serial interface (provided by a CH340X USB-UART adapter), with the firmware based on the AR488 project.

The adapter supports both the VXI-11.2 and Prologix protocols, though not at the same time (due to ROM size limitations). All design documents are available via the GitHub repository, with the author also selling assembled adapters and providing support primarily via the EEVBlog forums.

DIY Driving Simulator Pedals

In the driving simulator community, setups can quickly grow ever more complicated and expensive, all in the quest for fidelity. For [CNCDan], rather than buy pedals off the shelf, he opted to build his own.

[Dan] has been using some commercial pedals alongside his own DIY steering wheel and the experience is rather lackluster in comparison. The build starts with some custom brackets. To save on cost, they are flat with tabs to let you know where to bend it in a vise. Additionally, rather than three sets of unique brackets, [Dan] made them all the same to save on cost. The clutch and throttle are a simple hall effect sensor with a spring to provide feedback. However, each bracket provides a set of spring mounting holes to adjust the curve. Change up the angle of the spring and you have a different curve. The brake pedal is different as rather than measure position, it measures force. A load cell is perfect for this. The HX711 load cell sensor board that [Dan] bought was only polling at 10hz. Lifting a pin from ground and bodging it to VDD puts the chip in 80hz, which is much more usable for a driving sim setup.

[Dan] also cleverly uses a 3d printed bushing without any walls as resistance for the pedal. Since the bushing is just the infill, the bushing stiffness is controlled by the infill percentage. Aluminum extrusion forms the base so [Dan] can adjust the exact pedal positions. To finish it off, a bog standard Arduino communicates to the PC as a game controller.

The project is on GitHub. Perhaps the next version will have active feedback, like this DIY pedal setup.

Continue reading “DIY Driving Simulator Pedals”

Nebula Mouse with sliced CAD view in the back

Nebula Mouse: The 6-DOF You Build Yourself

Let’s say your CAD workflow is starving for spatial awareness. Your fingers yearn to push, twist, and orbit – not just click. Enter the Nebula Mouse. A 6-DOF DIY marvel, blending 3D printing, magnets, and microcontroller wizardry into a handheld input device that emulates the revered 3DConnexion SpaceMouse – at a hacker price. It’s wireless, RGB-lit, powered by a chunky 1500 mAh cell, and fully configurable through standard apps. The catch? You print and build it yourself, with a little help of [DoTheDIY]’s design files.

This isn’t some half-baked enclosure on Thingiverse. The Nebula’s internals are crafted with the kind of precision that makes you file plastic for hours just to fit weights correctly. Hall effect sensors track real-world movement in all axes; a Seeed Xiao nRF52840 handles Bluetooth duty. It’s hefty (280 g), intentional, and smartly designed: auto-wake, USB-C, even a diffused LED bezel for night-time geek cred. Just beware that screw lengths matter. Misplace a 20 mm and you’ll hear the soft crack of PCB grief. No open firmware either – you’ll get compiled code only, unlocked per build via Discord.

In short: it’s not open source, but it is deeply open-ended. If your fingers itch after having seen the SpaceMouse teardown of last month, this might be what you’re looking for.

Illustrated Kristina with an IBM Model M keyboard floating between her hands.

Keebin’ With Kristina: The One With The Bobblehead

No, see, it’s what’s inside that counts. Believe it or not, [nobutternoparm] retrofitted this innocent, adorable little tikes® so-called “Kidboard” rubber-dome keyboard into a mechanical marvel. Yeah! No, it wasn’t exactly pure, unadulterated fun, nor was it easy to do. But then again nothing worth doing ever is.

A Little Tikes keyboard, retrofitted with a custom mechanical keyboard.
Image by [nobutternoparm] via reddit
For one thing, the PCB ended up being a bit too wide, so the bottom half of the case is a bit mangled. But that’s okay! Onward and upward.

Next problem: a real PCB and mechanical switches (Gateron Baby Kangaroos) are a lot taller than the previous arrangement. This required spacers, a mounting plate, and longer screws to hold it all together. Now imagine lining all that up and trying to keep it that way during assembly.

And then there’s the keycaps. Guess what? They’re non-standard because they’re for rubber domes. So this meant more adapters and spacers. You’ll see in the gallery.

So we know it looks great, but how does it type? Well… [nobutternoparm] gives the feel a 4/10. The keycaps now have too many points of contact, so they bind up and have to be mashed down. But it’s going to be a great conversation piece.

Continue reading “Keebin’ With Kristina: The One With The Bobblehead”

Illustrated Kristina with an IBM Model M keyboard floating between her hands.

Keebin’ With Kristina: The One With The Protractor Keyboard

Don’t you love it when the title track is the first one on the album? I had to single out this adjustable keyboard called the Protractor, because look at it! The whole thing moves, you know. Go look at the gallery.

The Protractor, an adjustable monoblock split keyboard with sliding angles.
Image by [BFB_Workshop] via reddit
If you use a true split, even if you never leave the house, you know the pain of losing the good angle and/or separation you had going on for whatever reason. Not only does this monoblock split solve that simply by being a monoblock split, you can always find the right angle you had via the built-in angle finder.

[BFB_Workshop] used a nice!nano v2, but you could use any ZMK-supported board with the same dimensions. This 5 x 12 has 60 Gateron KS-33 switches, which it was made for, and has custom keycaps. You can, of course, see all the nice, neat ribbon cable wiring through the clear PLA, which is a really great touch.

This bad boy is flat enough that you can use the table as your palm rest. To me, that doesn’t sound so comfortable, but then again, I like key wells and such. I’d still love to try a Protractor, because it looks quite interesting to type on. If you want to build one, the files and instructions are available on Printables.

Continue reading “Keebin’ With Kristina: The One With The Protractor Keyboard”

Illustrated Kristina with an IBM Model M keyboard floating between her hands.

Keebin’ With Kristina: The One With The Part Picker

If you do a lot of 3D computer work, I hear a Spacemouse is indispensable. So why not build a keyboard around it and make it a mouse-cropad?

A Spacemouse with an arcing keyboard built around it.
Image by [DethKlawMiniatures] via reddit
That’s exactly what [DethKlawMiniatures] did with theirs. This baby is built with mild steel for the frame, along with some 3D-printed spacers and a pocket for the Spacemouse itself to live in.

Those switches are Kailh speed coppers, and they’re all wired up to a Seeed Xiao RP2040. [DethKlawMiniatures] says that making that lovely PCB by hand was a huge hassle, but impatience took over.

After a bit of use, [DethKlawMiniatures] says that the radial curve of the macro pad is nice, and the learning curve was okay. I think this baby looks fantastic, and I hope [DethKlawMiniatures] gets a lot of productivity out of it.

Continue reading “Keebin’ With Kristina: The One With The Part Picker”

SpaceMouse Destroyed For Science

The SpaceMouse is an interesting gadget beloved by engineers and artists alike. They function almost like joysticks, but with six degrees of freedom (6DoF). This can make them feel a bit like magic, which is why [Thought Bomb Design] decided to tear one apart and figure out how it works.

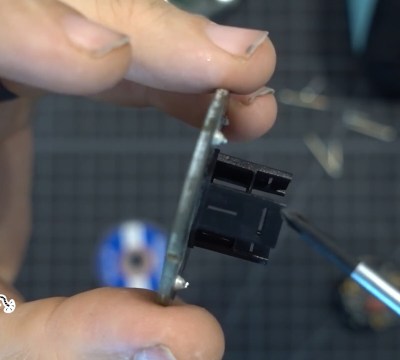
The movement mechanism ended up being relatively simple; three springs soldered between two PCBs with one PCB being fixed to the base and the other moving in space. Instead of using a potentiometer or even hall effect sensor as you might expect from a joystick, the space mouse contained a set of six LEDs and light meters.

The sensing array came nestled inside a dark box made of PCBs. An injection molded plastic piece with slits would move to interrupt the light coming from the LEDs. The mouse uses the varying values coming from the light meter to decode Cartesian motion of the space mouse. It’s very simple and a bit hacky, just how we like it.

Looking for a similar input device, but want to take the DIY route? We’ve seen a few homebrew versions of this concept that might provide you with the necessary inspiration.

Continue reading “SpaceMouse Destroyed For Science”